Hornindalsøl a raw ale

My latest beer was my first raw ale. This means that it is not boiled after the mashing. Obviously, it is nice to save the time spent boiling, but it increases the risk for contamination. Moreover, it turns out that I still ended up spending a lot of time for the brewing.

The beer I was making was an attempt of recreating the beer made in Hornindal as described in the awesome book “Gårdsøl” by Lars Garshol. Since, I don’t have a large farm and room for lots of equipment I decided to modify the process a bit. Both to make it easier for myself and to reduce the risk of contamination.

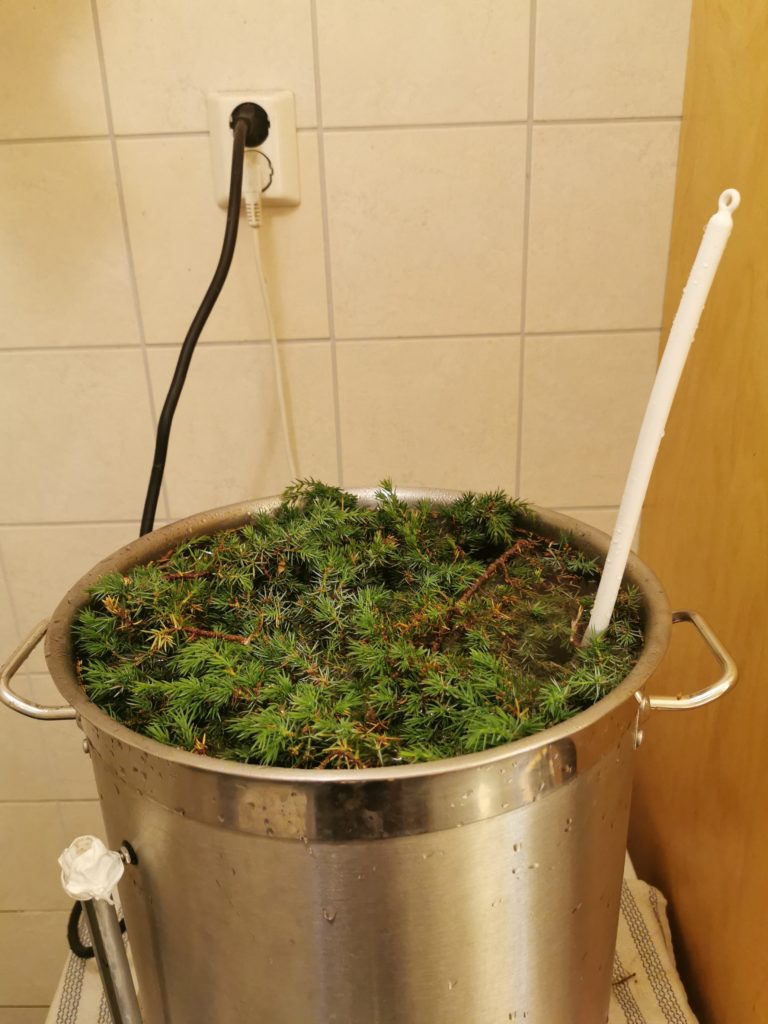
My idea was that the less equipment I used and the less I transferred the beer around, the less the risk of contamination would be. I therefore decided to do the mashing in the pot used for boiling the junipers. Unfortunately, I had thrown away my bag for the brew in the bag procedure. To my surprise and delight, that was not a problem at all. My process and recipe was as follows:

  1. Fill the pot with juniper and bring it to a boil.
  2. Boil for 15 minutes. Make sure to put things needed for the rest of the process inside the boiling einerlog (juniper tea) to disinfect it.
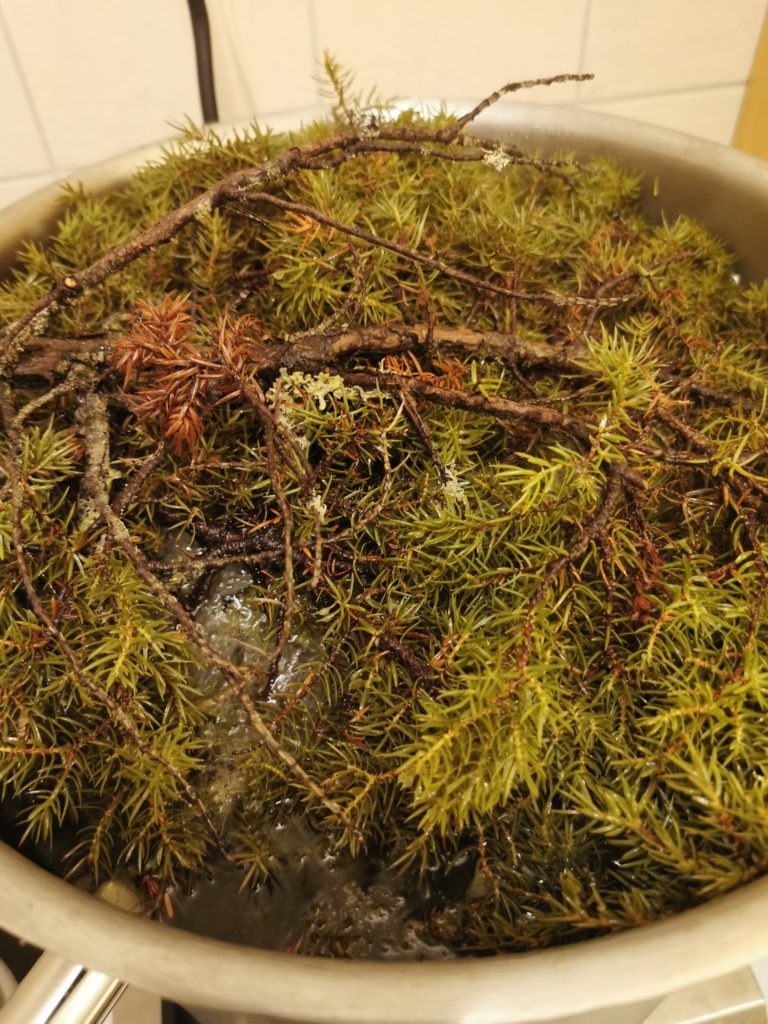
  3. Take out most of the juniper and wait for the temperature to drop to mashing temperature . Some Juniper is left to function as a filter when the wort is tapped.
  4. Before adding the malt put 50 grams of Saaz hops in a disinfected bag in front of the wort outlet. This will be an extra filter in addition to the juniper.
  5. Add 4kg of pilsner malt and 4kg of pale ale malt. The mashing temperature is 74° C and the duraiont is one hour.
  6. Tap the wort and wait for the temperature to reach 38° C and add the kveik. Fermentation should be done in two days.
Boling the einerlog

Of course things did not go as planned. Everything was fine until I started the mashing. I added the malt when the temperature had dropped to 77° C. To my surprise this made the temperature go all the way down to 70° C. In a response to this I switched on the plate to heat the mash. However, I think the temperature measurement was a bit off. Because the temperature quickly rose to 81° C. At which point I switched off the plate and crossed my fingers.

The next surprise was when I was going to add the yeast. Since I hadn’t disinfected the wort cooler the temperature fell way too slowly. I therefore decided to go to bed and drop in the yeast before going to work. Due to this the kveik ended up being out of the fridge for more than 15 hours before I finally added it to the wort. This came on top of it having been transported for 2 days in the post before arriving in my post box. I could only pray it was as robust as rumors would have it.

I am not sure if it was the treatment of the yeast or the high mashing temperature, but as can be seen from the plot above, the kveik did not provide the fast fermentation it’s known for. In the end I had to tap the beer at an SG far above the target of 1.018, to serve it to friends coming over. Despite the trouble the end result was very good and got lots of praise. Although, we all agreed it was a bit sweet.

Beer ready for consumption

Luckily, the story of this beer does not stop here. The next weekend I wanted to have a sip of the beer. When I started tapping, I got quite surprised to see that the keg pressure had increased. I checked the CO2 regulator and it was off. My hopes were high as I eagerly took a sip. To my delight my suspicion was correct, the beer had fermented in the keg. What I now had in my hand was a beer with an amazing balance between exotic fruity and malty taste. The overly sweetness was gone and the beer was now a perfect summer ale. Due to the pressure the beer had also been nicely carbonated. I know farm house ales should not be this carbonated, but I really don’t care as I am quite certain this is the best beer I have made so far.

I top harvested some of the yeast during the fermentation and I am very eager to see if I can recreate this amazing beer. With all my mistakes it may turn out to be challenging, but I will try my best.

My best beer so far

My first traditional beer with kveik

I first heard about kveik while on a researcher exchange in France in 2018. It was on a list of top ten things to try while visiting Western Norway. As a beer enthusiast, I was happy to learn that Norway had something more to offer than standard pilsner and micro breweries. Don’t get me wrong I love the micro breweries, and I have enjoyed a fair share of pilsners. However, it is nice to try something that is unique for Norway.

Kveik ready for the next batch.

Kveik is a very interesting yeast. It produces good beers at temperatures up to 40°C (Fermentation temperature). Due to the high temperature it is also very fast and you can have a beer ready in a couple of days. Moreover, the yeast gives very interesting flavors. For instance Sigmund’s Voss Kveik, which is the one I use, has been said to give a taste similar to orange peel. If i had to describe my beer I would say it tasted something in between a punch and a fruity IPA. Although, the best would be to just try a beer made from a good recipe. I have previously tried some beers with Kveik bought at the liquor store, but they tasted more like normal beers. A very good source for those interested in learning more about Kveik is the blog http://www.garshol.priv.no/blog/.

The recipe

I got the recipe from the book Gårdsøl – det norske ølet. The book is available in both Norwegian and English at http://www.garshol.priv.no/blog/ . It’s my understanding that it’s an adaption of Sigmund’s recipe for home brewer equipment. Sigmund is a Norwegian guy from Voss who does traditional brewing using Kveik. Some may already have guessed that it is also him we have to thank for providing Sigmund’s Voss Kveik. The ingredients for making the beer follows below, shortly followed by the procedure. (In the book he used 80g of hops)

4 kg pilsner malt
4 kg pale ale malt
100g Saaz hops
Sigmund’s Voss kveik
Lots of juniper

Anyone , familiar with beer recipes may see that this looks like a normal recipe. Except for the kveik and the juniper. I myself was surprised to learn that juniper belonged in beers. I have alot of experience of getting rid of junipers and getting itchy red legs from them, but I would never have believed they belonged in a beer. However, as it turns out all traditional Norwegian beer recipes I have read includes junipers. ( I have not read that a many only those mentioned in Garshol 2016, and one from the grandfather of a friend of mine). Interestingly enough, I just read in Brunstad 2019, that ancient Egyptians also used some type of juniper in their beer. I guess junipers has belonged in beers for thousands of years. Hopefully, this will inspire brewers to thin out the junipers growing below some of my favorite climbing routes.

The juniper is used to make some type of tea called einerlog. Log is a Norwegian word meaning the liquid you get when you boil plants in water or the liquid you pour on your malt for the mashing. After this short explanation, it should come as no surprise that the einerlog is poured on the malt instead of hot water.

I also poured myself some einerlog in a glas. It tasted like a nice tea and to my relief I had no allergic reaction, like the one I get from the juniper needles. An example of what the einerlog looked like in my case is given below.

Einerlog ready for consumption

According to the recipe the kettle should be filled to the brim with junipers, without pressing them together. I didn’t find any instructions on how long the branches should be, so I went for the part with most needles. In my case that was 20-30cm. The einerlog should be heated up to 90°C before pouring it on the mash and the mashing starts at 69°C and lasts for three hours. At this point I was confused and I waited until the einerlog reached the mashing temperature. After a closer inspection, it seems that I could have mixed in some cold water to cool it down.

Preparing the einerlog

The mash is also supposed to contain juniper and half of the hops. I am not sure how much juniper to add to the mash, but I added some at the bottom to help filtering the beer. From what I have read juniper is used as a filter in traditional brewing, so this seemed natural.

Juniper as a filter in the mash.

After the mashing the beer should be boiled for 4 hours. This should boil away half of the liquid. I filled my kettle as much as I dared and ended up with around 15 litres of beer. The rest of the hops are added at the last 15 minutes of the boil. Unfortunately, I started a bit late with the brewing. I therefore, decided to go to bed while it was boiling and set the alarm for half an hour before it was done. Maybe a risky move, but I put on the timer on the plate as a safety mechanism.

I was quite sleepy when cooling the beer, so I cooled it too much before adding the Kveik. The starting temperature was at 27.8°C, which is a bit short of the desired 38°. However, as can be seen from the chart below the temperature quickly rose to a nice range. The OG was 1.085 and the FG 1.017, both a bit higher than the targets of 1.080 and 1.014 respectively.

Plot of SG and temperature during the fermentation.
s

I invited some friends over to taste the final product. Despite some of the mistakes I made during the process, they seemed quite happy. In fact much more of the beer than what I had planned for disappeared. Luckily, this gives me a good excuse to try the recipe again with the yeast and experiences I harvested from this attempt.

My first attempt at a traditional beer with kveik.

References

  • Garshol, Lars Marius. (2016 ). Gårdsøl: Det norske ølet. Cappelen Damm. ISBN 978-82-02-51746-5
  • Brunstad Sissel. (2019)- Norsk Ølhistorie: Frå odins skål til i dag. Skald. ISBN 978-82-7959-289-1